Blackberry

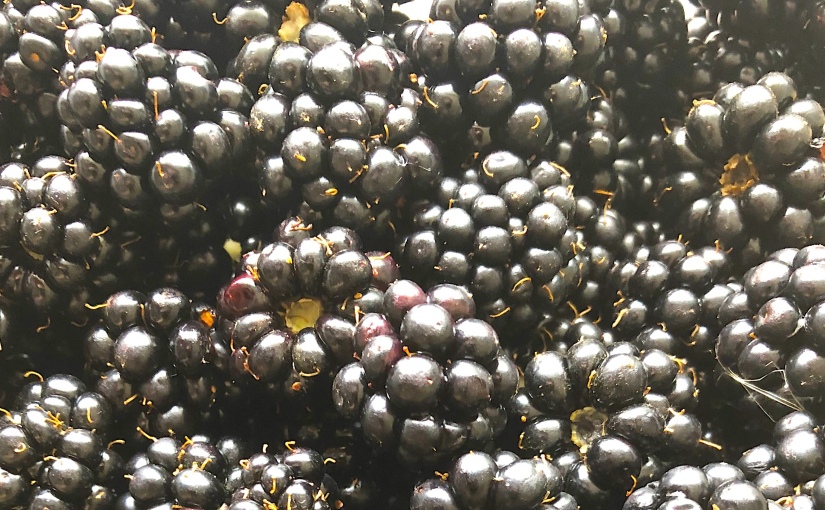
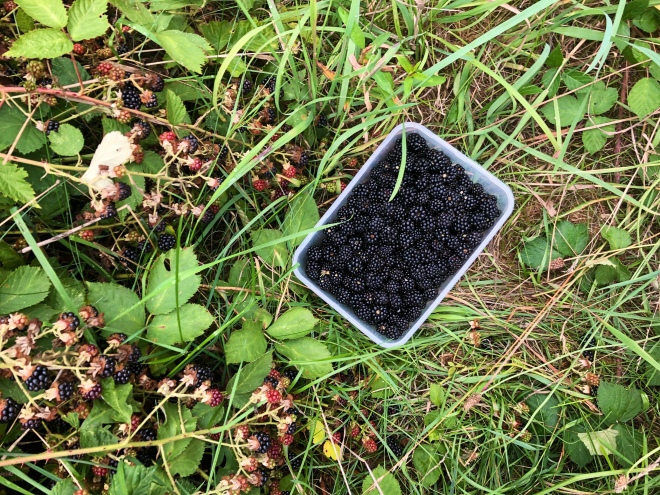
With the hot dry summer we were having until a few weeks ago I thought the blackberries would be small dry and bitter this year but it seems the rain came just in time. Beautiful big juicy berries are all over the woods behind our house. So out we went with tubs to fill, me in my yellow wellies Joel in shorts (shorts?!?!) and in half an hour had easily filled 2 large tubs. I could not recommend it more as a Sunday afternoon activity being out in the woods picking fruit really takes you back to being a kid again plus free fruit! I made a crumble of course (blackberry, apple and orange with an oatey topping) and some blackberry vinegar to try and keep the flavour of these delicious fruits for the months ahead and to liven up some winter salads.

Quick garden update: both the veg and the flowers are massively appreciating the rain, the greens are doing particularly well now and I have been handing out green bouquets of lakes, chards and aztec broccoli (watch this space). I have one very small butternut squash from my roadside seedling purchase so fingers crossed but in my heart of hearts I suspect it won’t ripen very well in a Manchester autumn but it’s been loads of fun to try.

Blackberry and Sage Vinegar

  • 700g blackberries – rinsed
  • 700ml apple cider vinegar
  • 350g granulated sugar
  • 6 Sage leaves

Optional equipment- paper coffee filters

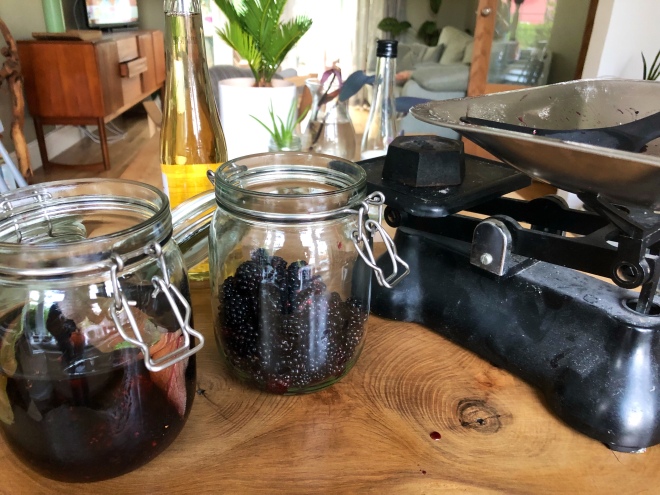
In a Kilner type jar (who actually buyer kilner when Ikea do them so cheap?!?) add your blackberries, sage leaves and vinegar.

Leave for at least a week although 3 weeks would be better.

Strain the vinegar through a sieve into a pan and discard the blackberries.

Add the sugar to the pan and heat over a low heat until all the sugar has dissolved.

Once the sugar has dissolved bring to the boil and then simmer for 20 minutes stirring occasionally.

Leave to cool.

I then like to filter the vinegar as it creates a lovely clear liquid and will last longer as you have removed impurities. To do this arrange a coffee filter in a funnel over the bottle you will store the vinegar in and slowly add the vinegar to the filter ensuring it doesn’t go above the top of the paper.

Enjoy!

I would use this on salads – delicious with bitter leaves or peaches. You could also use it as the base of a sauce to go with venison or duck in the winter.

Ps Joel’s legs looked like he had had a run in with a gang of angry cats – morale of the story don’t wear shorts to pick blackberries!

Cherries

Cherries are without doubt my favourite fruit but I’m only interested in them when they are fresh and in season, its not that I’m evangelical about local seasonal produce (I do my best but can always be tempted by something exotic) it’s that the cherries flown in when they are out of season taste of nothing but disappointment and nobody wants that! So I was absolutely delighted to find the week we spent at my Aunty Sandie’s in France coincided perfectly with their cherry tree being absolutely laden with ripe cherries – my absolute dream.

We spent a week soaking up sunshine, relaxing in the pool, eating Sandie’s fabulous food and stuffing ourselves with cherries. I meant to make this recipe when we were out there but I didn’t manage to summon up the effort of doing so when the other option was lying by the pool so it served me right when I had to buy the cherries when I got home. It’s a French inspired recipe though so it did feel like we were keeping the holiday going back home, especially with the amazing weather we have been having.

Cherry and Almond Clafoutis

Serves 6 – or two super greedy people who find it acceptable to also eat for breakfast

  • 400g of cherries – stalks removed but with the stone left in.
  • 250ml whole milk
  • 1tbsp good quality vanilla extract
  • 2 eggs
  • 100g caster sugar
  • 50g butter
  • 25g plain flour
  • 25g ground almonds
  • 3tbsp chopped almonds

stale_thumb_a9e5stale_thumb_a9f9a0ZqpukpTt2ESmfbC8cUyw_thumb_a9febohaNGPGRuS96NKlV7opYg_thumb_aa0f

In a 23cm round deep pie dish spread out the cherries – the stones are left in as they impact a bitter almond flavour.

In a pan heat the milk and vanilla and on a high heat take to the boiling point then immediately remove from the heat, add the butter whisk together then set aside until it cools.

Whisk the eggs and sugar until well combined, add the flour and ground almonds, whisk to combine. Add the milk mixture and whisk again to combine ensuring there are no lumps. Set the batter aside for 20 mins whilst the oven preheats to 180 degrees.

Pour the batter over the cherries and pop in the oven for 25-30 mins until golden on top and only slightly wobbly.

Serve at room temperature with the chopped almond and sugar sprinkled over. Warn people that there are stones in the cherries!

Just a few holiday pics as well…

UNADJUSTEDNONRAW_thumb_a95cstale_thumb_a958uKXH+XbkTrq0lHe51yxYDQ_thumb_a950ttjAnTkIRNG+gnwiujCY4w_thumb_a964UNADJUSTEDNONRAW_thumb_a92cUNADJUSTEDNONRAW_thumb_a934

Forced Rhubarb

Rhubarb is one of my favourite fruits and as a very inpatient person trying to eat more locally and seasonally forced rhubarb is a real treat if a bit pricey. I bought and cooked this Rhubarb at a farm shop after a fab afternoon at the Yorkshire sculpture park a couple of weeks ago when spring seemed to be in the air. Since then we have had some freezing snowy snaps (and a sneaky holiday to Cuba for some sun) but with the clocks changing this weekend and my bulbs popping up I’m hoping spring will be coming back soon.

Forced Rhubarb is deliciously fresh, delicate and shocking pink so I didn’t want to mess with it too much; I wanted to cook it in a way that the colour and texture remain in tact to celebrate this fab ingredient for the short period we have it for. This recipe is similar to something we served at our wedding last year – we had a trio of deserts one of which was cardamom poached Rhubarb so I thought it would be fun to recreate it.

Cardamom and Rose Poached Rhubarb

  • 3 sticks of forced rhubarb
  • 50g of sugar
  • 15 cardamom pods
  • 1 tbsp rose water

VudopPbfR86ZYq8m%rNCaA_thumb_a592VXzAbIaYQ32koCXJRuSj7w_thumb_a594yhvrAJQdQ9+QYllKLXNPGg_thumb_a59cLMzXXK1uRe2EqOMAoGgR0g_thumb_a5a5

Pre-heat oven to 150 degrees.

Trim the Rhubarb into 2 inch lengths and arrange in an ovenproof dish.

Bash the cardamom pods so that the flavour can get out add to a pan with the sugar and 250ml of water and simmer over a low heat until the sugar melts then continue to simmer over a low heat for 10 mins so the flavour of the cardamom can infuse. Remove from the heat and add the rose water.

Pour the syrup over the Rhubarb and place in the oven for 15-20 mins until the Rhubarb is soft but still retaining its shape.

The Rhubarb and Syrup is delicious on its own, with Thick Greek yoghurt, ice cream or meringues.

The Orange

Joel had an idea for this new year, instead of setting resolutions that are inevitably negative and about deprivation we are setting goals for the year instead, for me its to write more on here, to see more paintings out of my 1001 paintings to see before you die and definitely getting started on our garden, I’m sure over the next few weeks there will be more set but I like the idea of striving to achieve something rather than giving something up, which in the dark days of January feels twice as miserable as any other time of year.

I think January is a tough month for people, the depths of darkness with no Christmas to look forward to, the weather tends to get colder, and of course everyone is feeling a little tight on funds after the festive period. Therefore I think we could all do with something bright an fresh to cheer us up, this is a great salad for sharing and you could definitely justify it if unlike me you are trying to stick to those resolutions – plus the dressing uses up some of that cheese board port you still have knocking around (the booze doesn’t count in food, everyone knows that) so why not invite a few people over and brighten up January together.

Oranges always feel like a bit of a faff to me and would normally grab a clementine or tangerine over their full size cousin as the convenience of being able to peel on the go is so easy so I think when you go to the effort with peeling and carefully slicing an orange it feels a bit special. Particularly when they are in season and at their best from closer to the UK at this time of year.

Caramelised Orange and Fig Salad

Adapted from Ottolenghi’s in Plenty More

Serves 4 as a light salad.

  • 75g of caster sugar
  • 4 Medium Oranges – peeled and cut into 1cm slices
  • 8 Fresh Figs – quartered
  • 200g Feta
  • 1 bag Rocket
  • 1 Bag Baby Kale – or other sturdy salad leaf

Port and Lemon Dressing

  • 3 tbsp Lemon Juice
  • 3 tbsp Port
  • 1 tsp Fennel Seeds – toasted
  • 4 tbsp Rapeseed or Olive Oil

wmmKVa4oTJqbgAHd70R23w_thumb_a4c8dKaxbhAeReixGxQzbQo9qQ_thumb_a4cc7sk8lySoT7eKTGBtEaj0rA_thumb_a4cdMj5ATpUYRrasxJWcgm2aCg_thumb_a4d7

Warning: I am crap at making caramel – its gone wrong so many times in the past but the last few times I have done it right so here is the best way I’ve found to do it.

Using a (clean and very dry!) flat based frying pan pour the sugar in ad shake the pan to distribute evenly, put onto a medium heated hob. DO NOTHING, do not touch, do not shake, do not stir, just stand and hold your breath. The sugar should begin to melt and turn a lovely well caramel colour.

If not – if it clumps into a horrible mess unlike me don’t throw a paddy just add a cup of water to the pan and stir to the sugar all dissolves and makes the washing up a lot easier, clean and dry your pan and try again – hey at least sugar is pretty cheap.

Whilst your sugar is melting (or before if you are really anxious to watch it) spread your salad leaves over a serving platter, arrange half of the figs on top and crumble over half the feta.

Once you have your lovely golden caramel add half your orange slices whilst keeping on a medium heat, turn them over after about a minute, by which time they should have a lovely shiny caramel coating, allow another minute on the reverse side, set to one side then repeat with the rest of the oranges.

When all your oranges are caramelised remove the pan from the heat and add your dressing ingredients into the pan along with the caramel, give a quick stir to combine then pour into a jug.

Arrange your Caramelised Slices of orange over your salad platter, scatter your remaining figs and feta over the top.

Serve warm with the warm port and lemon dressing.

Note: If you would like to use this dressing on other things – which I highly recommend as it’s delicious then add a 1½ tbsp of honey to the above ingredients as you wont have the sugar from the caramel to balance!

I hope you have a wonderful new year and you achieve all those goals you set big or small.

Marmalade

I never saw the appeal of marmalade; I found it a bitter imitation of jam, however a few weeks ago I braved some a family friend had made on toast with a big mug of tea and found it irresistible, the balance of acidity, bitterness and sweetness is just perfect. I think the bitter flavours are something you develop into so I’m classing my graduation from jam to marmalade as a sign that I am a grown up and therefore should be getting married and buying a house.

The crucial ingredient in marmalade is the bitter Seville orange, which are only available for a short window from the end of December to the start of March, not exactly local for me (as the name may suggest) however the bright citrusy flavours on a cold Febuary day are hard to resist and the scent in my kitchen was amazing. I had a few Seville oranges left and I’m finding more uses for them – a squeeze of the juice into an Old fashioned gives it a lovely bitter orange edge (and is turned into a real treat when you use chocolate bitters – Chocolate orange in a glass). I am also enjoying having a slice in my morning hot water rather than lemon.

Like any convert I am getting a little evangelical in my new obsession. I’m hoping to go to The Dalemain marmalade awards, held in mid March in the Lake District to buy some excellent new jars and to get ideas for my next years production. Whilst waiting for the award winners I thought I would try a recipe from my favorite preserving book “Salt, Sugar, Smoke” by Diana Henry.

Diana’s recipe calls for blood oranges however as my greengrocer didn’t have any so I used another variety nicknamed “pink oranges” so the finished marmalade still has a pinkish hue rather than the deeper red of the true recipe. My greengrocer also suggested adding a bit of lime juice for a sharp edge – I can’t honestly say I can taste the lime but the marmalade is fab and maybe without it it would be missing something – we wont know until I make it again without.

Note – you need to start the recipe the day before in order to leave the skins to soak.

Breakfast Marmalade

  • 1 pink or red grapefruit
  • 4 pink oranges
  • 3 Seville oranges
  • 150 ml lemon juice
  • 1 lime Juice
  • 2 kg of granulated sugar

img_4701img_4711img_4738img_4749

Day 1

Wash all the fruit, peel the grapefruit and cut the skin into fine shreds. Juice all of the oranges (retaining the skins) Measure how much juice you have and top it up with water to 2.5 ltrs in a large mixing bowl.

Scoop the flesh out of the grapefruit and tie into a muslin bag, add to the bowl of juice. Shred the orange skins as finely as possible and add to the bowl.

Leave everything to soak overnight.

Day 2

Add all the contents of the bowl to a preserving pan (or large saucepan) and cook over a medium heat until the skin is completely soft it took mine about 1 hour 45 mins. Strain through a sieve, retaining the shreds but discarding the grapefruit muslin bag. Measure the liquid and top up with water or reduce to 1.5 ltrs, Return to the pan.

Add the lemon juice, lime juice and sugar to the pan ad gently heat to dissolve. Bring to the boil and skim off any scum. Add the shreds and return to the boil.

Continue to boil until it reaches the setting point, either on a sugar thermometer or use the wrinkle test (see below).

Skim off any scrum then allow to cool for 10 minutes before spooning into dry sterilized jars.

The Wrinkle Test

A sugar thermometer is great but if you don’t have one or like me its boxed up at your parents house with most of your other kitchen equipment whilst you wait to move house. When making preserves the wrinkle test is a great way of checking if your jam or marmalade will set without the need for a thermometer.

Before you start making your jam pop a couple of saucers or small plates in the freezer (I use one of my enamel ones as they cool quicker). When you think your preserve is almost set drop a teaspoon of the mixture onto the cold saucer and leave for 60 seconds, push your finger through the middle of the mixture. If the mixture wrinkles as you push through – great you have reached setting point, take it off the heat. If not then cook for another 5 minutes and then perform the test again.