Courgette Two

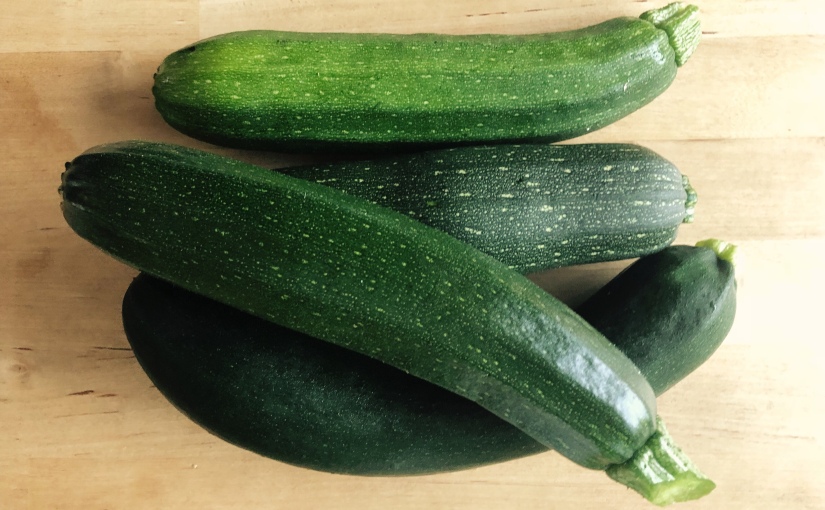
The sounds of a productive garden in summer, the buzzing of bees, the tweets of birds and the groaning of the courgette plants under the weight of their fruit… the last one may be exaggerated but not by much! The garden has been going crazy with all the sunshine and thankfully now the odd downpour. Nothing has appreciated this weather more than the courgettes which have gone from zero to more than you can possibly eat in the space of a fortnight. We have four plants and I picked 6 courgettes off of them on Monday. Having already picked two over the weekend and more will be ready for the weekend. Added to this I rather stupidly have not reduced our local veg box scheme so guess what came in there!

Needless to say I was racking my brains for an idea of how to use so many at once because as much as I love griddling them for salads there are only so many I can eat that way! So I started thinking about the best meals I’ve eaten with courgettes and it came to me – at an amazing restaurant in Istanbul called Lokanta Maya we had the most incredible courgette fritters. Luckily the dish is so popular the recipe is written on a mirror on the wall of the restaurant. I recreated them with a few tweaks and I think they went down well – Joel described them as tasting “a little bit naughty” which I think is a good thing.

Courgette Fritters

  • 1kg courgettes (4 medium)
  • 1 tbsp salt
  • 100g whole meal flour
  • 100g plain white flour
  • 4 eggs
  • 100ml milk
  • 1 handful flat leaf parsley
  • 4 spring onions
  • 150g feta
  • 300ml vegetable oil for frying
  • Greek yoghurt to serveGrate the courgettes and place in a colander over a bowl, mix with 1 tbsp salt and leave for 30 mins then squeeze our all the liquid you can.

If you wish to keep each batch warm and serve together pre heat the oven to a low warming temperate – about 75 degrees and pop a baking tray in the oven.

Finely chop both the parsley and spring onions and add to the courgette.

In a large bowl combine the flour, eggs milk and pepper  then whisk until a smooth batter.

Crumble the feta and mix through the batter.

In a large frying pan pour in enough oil to create a 1cm deep layer of oil and heat over a medium to high flame. Once the oil is hot (test with a tiny drop of the mixture, it should bubble and sizzle as soon as it hits the pan if it’s ready).

Carefully and in small batches add 1 tbsp of the mixture to the pan, fry for about a minute and a half before turning over and frying for a further minute. Remove with a slotted spoon and turn into kitchen roll or if like me you have a tray over a plate.

One the batch are ready to be removed from the pan transfer the resting ones to the oven.

Serve with some Greek yogurt and/or a squeeze of lemon juice. Great as a snack, starter or side.

Sugar Snap Pea

I am so excited about our garden at the moment, particularly the vegetables, they are coming on amazingly well hugely helped by the gorgeous unheard of sunshine we are having in Manchester. The beetroot and chard have recovered from the leaf miner bug that devastated them a few weeks ago, the kale has recovered from their caterpillar attack and everything else has just grown like the clappers. The first photo was taken 2 weeks ago, and the 2nd this morning, I cant believe how fast everything is growing!

UNADJUSTEDNONRAW_thumb_a98eIMG_8030

One thing that hasn’t grown quite as well as I would have hoped is the sugar snap peas, whilst we have had a few, and I’m guilty of eating one every time I go out to the garden to inspect the veg they haven’t given us the abundant harvest I was hoping for. From what I gather they don’t love too much sunshine and dry weather so maybe that’s where they have fallen down a bit. Never mind, the rest of the crops most than make up for them.

So with my handful of pea pods that made it inside I thought I would make a delicious light meal for one that really showed them off. I always think a meal for one is an opportunity to really treat yourself; you don’t have to pander to anyone else’s tastes you just get to have all the things you love. Gnudi is similar to gnocchi but without potatoes, the main component is ricotta so they are much lighter and more summery and work so well with some fresh green veggies, in this case my lovely sweet sugar snap peas.

Ricotta Gnudi with Peas

Serves one – could easily be multiplied for up to 4 people I think more would be a faff.

  • 175g ricotta
  • 1 egg yolk
  • 3tbsp Parmesan
  • Gated nutmeg
  • 75g fine semolina*
  • 25g butter
  • 8 Sage Leaves
  • Handful of sugar snap peas

WOwIQu+GRKCs19qZ7bd80w_thumb_a9c0QbZpXsegSi24oO5QqWzldg_thumb_a9c6E3k7%oGtSBS2fztj2MA3cg_thumb_a9cehtyFCx3bS9KELydh+37zIw_thumb_a9d0maFrgfw2Qxu3Q2ijmyDmZA_thumb_a9d7eDwxOmc1QPeBMYJ%EPiZDg_thumb_a9db

Strain the ricotta in some muslin – either overnight hanging or if your unorganised like me by squeezing it until as much liquid as possible comes out.

Combine the strained ricotta, egg yolk, parmesan and a good grating of nutmeg to form a thick dry-ish paste.

Spread a layer of semolina onto a plate, dampen your hands with water then cover in semolina – roll small ball of the nudie mixture in your hands to make a small sausage (there should be 12-14 gnudis) then place on the plate of semolina.

In a perfect world place the gnudi – covered in a clean tea towel (not cling film!) in the fridge for at least 4 hours so a skin forms and the center firms up. You can skip this step as long as you got your ricotta really dry and are careful with the next step although they wont be as perfect.

Add the gnudi a few at a time to a just simmering pan of salted water (if its boiling they will go to mush!) as soon as the nudies float to the surface fish out with a slotted spoon and place to one side on a plate. Repeat until all the nudies have floated up to the surface.

In a frying pan over a medium heat add the butter, once it has melted add the sage leaves for 1 min so they flavour the butter, add the gnudi and sliced sugar snap peas and cook for 2 mins until the nudies are lightly golden and the peas have softened slightly but still have bite.

Serve and enjoy – hopefully outside in the lovely sunshine!

*If you cant find fine semolina put blitz semolina in the blender for a few mins.


Jerusalem Artichokes

When the vegetable box came a couple of weeks ago and in with my cabbage, mushrooms, apples etc was a brown paper bag of knobolly strange little vegetables I’ll be honest I wasn’t sure what to do with them. I have eaten Jerusalem Artichokes before however it’s always been in the form of a mash or puree or soup – in other words mushy! Don’t get me wrong I like a break for my teeth once in a while and I love mash but I was keen to try something different. I used their earthy nutty flavour as a guide and combined with some smoky bacon and Rosemary as well as a fresh hit of lemon to make a nice simple side dish.

The Jerusalem Artichokes is earthy and nutty like a globe artichoke, but is not related to them, in fact it’s a type of sunflower which having googled what their flowers look like you can instantly see – I am definitely going to consider growing them as apparently they are super easy to grow – let me know if anyone has any experience of growing them?

The garden is progressing slowly, weighing it up against working on the house (the house won this bank holiday – the plus side being the whole of downstairs has now been decorated!) but we had some sunshine last Sunday so we dug two vegetable patches out of the lawn and I traipsed up and down the side of the house with barrow loads of compost, we now have what very much looks like two lined up graves in the garden. Hopefully when we use some wood to make them into raised beds they will look less grave-y – fingers crossed. We also laid out lots of string for beds and paths so we have a pretty good idea of what it will all look like. Dad is coming up next weekend and bringing his fancy new chainsaw to help us cut down a couple of the oak tree branches to raise the canopy and let a bit more light into the bottom of the garden and I’ll get to grill mum on ideas for planting. Holding out for a few sunnier, or at least not rainy days so we can get to work on it.

Anyway enough garden rambling back to the vegetables..

 Earthy Jerusalem Artichokes

Serves four as a side dish

  • 8 medium Jerusalem Artichokes
  • 1 lemon – zested and juiced.
  • 5 Rashes of smoky streaky bacon
  • 1 tbsp butter
  • 1 tbsp of finely chopped Rosemary
  • Optional delicious extra – a few drops of truffle oil

%WhK0G7LRgeLk6uy5TmlHA_thumb_a599hDW%I1GdStmZhdfLVUnxDw_thumb_a5a1

The artichokes will go brown if peeled and left out so first of all fill a mixing bowl with cold water and add the juice of the lemon to the water – as you peel each artichoke pop them straight into the lemony water. Once they are all peeled chop into small wedges.

Drain the wedges from the lemon water and add to a shallow frying pan on a medium heat, add a mug full of water to the pan and cover with a lid or tin foil – this allows them to part steam part boil in the pan. Once you can hear the water simmering leave over a low to medium heat for fifteen minutes by which time the artichoke wedges should have softened but still retain their shape.

Whilst the artichokes are cooking fry or grill the bacon until it is nice and crispy, set aside to cool then slice into thin strips.

Remove the lid of the pan turn up to a medium heat and allow any remaining water to evaporate off then add the butter, rosemary, half of the lemon zest as well as a good pinch of salt and pepper. Sautee for around 5 minutes so all the flavours can combine and the artichokes can turn golden brown.

Serve with the remaining lemon zesty and for a real treat a few drops of truffle oil.

Cabbage

We spent last Sunday planting a new hedge at the bottom of our garden (excellent excuse to use the gardening equipment I got for my birthday) but it was absolutely freezing, so cold that I had to de-ice the padlock on the shed door before I could get into it, so I needed something warm and comforting for lunch.

We don’t eat a lot of potatoes in fact I asked the veg box to stop sending them as they were sprouting in the bottom of the box every week. Most of our meals lend themselves better to rice, noodles or pasta. Plus the form of potato I like best is mash potato with tons and tons of butter so not the healthiest of options. However a fabulous looking purple tinged January King Cabbage came in the veg box this week so I decided to try and counteract the butter with loads of cabbage if I wanted to claim it as vaguely acceptable for lunch so mash soon turned into Colcannon.

Now I’m sure purists would object to my addition of the onion and fennel topping but I think it adds a little extra and plus it’s delicious to use on everything.

Colcannon with Fennel and Onion

  • Half a cabbage
  • 6 small potatoes
  • 1 large onion
  • 2 tsp fennel seeds
  • Copious amounts of butter
  • 2 tbsp of crème fresh

UNADJUSTEDNONRAW_thumb_a52cuxxnu9sYSkmW67yiA3j4Mw_thumb_a532xKHDo1%uRZOZwxBAPy6ZNw_thumb_a53aWIr%nRKFRQiPB2CjEFX0Rw_thumb_a53d

Peel and chop the potatoes into quarters and add to a pan with boiling water and simmer until soft – around 25 mins depending on variety and size.

Meanwhile finely slice the onions and add to a frying pan on a low heat with a large knob of butter, after around 10 mins they should be soft and light brown, add the fennel seeds to the pan and cook for a further 5 mins over the low heat until sticky and soft. Remove from pan and leave to one side.

Wash the cabbage leaves, slice finely and add to the frying pan – the water on the leaves will help them soften and wilt – cook for a couple of mins until soft but not coloured.

Drain the potatoes, add back to the pan and mash with copious amounts of butter and the crème fresh along with a pinch of salt and pepper. Once lovely and smooth mix through the cabbage and serve with the onion and fennel on top.

If you’re feeling extra greedy and want to balance that goodness of cabbage you added to your mash – grate some cheese on top. If you’re feeling more patient and less greedy serve alongside sausages or roast chicken.

PS this is me being super excited about my new wheelbarrow! Note the accidental handle/Wellie combo

UNADJUSTEDNONRAW_thumb_a528


The Leftover Blue Cheese

Its easy to feel melancholy the first weekend in January, we have all gone back to work, its freezing cold and on top of that we have to take down the Christmas decorations! So I ignored that job on Saturday morning and instead put on my socks, then my thick socks, then my welly socks, doubled up my gardening gloves with warm gloves underneath and decided to do some clearing in the garden. After a good few hours of work out there I was starving and had completely forgotten how empty the fridge was. All we had were some last stragglers of veg from before new year and the leftover Christmas Stilton that mum sent us home with and were yet to fully stuff our faces on.

So I set about something hearty, rich and warming to recover from my stint in the garden and prepare myself for the miserable task of taking down the decorations. I debated a quiche or flan with the greens and cheese but they didn’t feel cosy enough for the weather – gooey rich pasta bake though would be spot on and added bonus – all the crucial ingredients are always in the cupboard!

Left Over Blue Cheese Pasta Bake

Enough to serve 6 – or one greedy girl with plenty of leftovers for the next few days

  • 300g dried wholemeal pasta
  • 50g cheddar cheese
  • 350g of Blue Stilton (don’t worry if you dotn have that much anything over 200g will be good)
  • 1 tsp dried herbs
  • Whatever veggies you have in the fridge: I used 1 large leek, 2 shallots, half a head of broccoli and a handful of kale.
  • A handful of breadcrumbs – I had panko in the cupboard so used them

Basic White Sauce

  • 75g butter
  • 75g plain white flour
  • 600ml milk

TTBu66VZRnabrJhRkHrMKg_thumb_a4fadeZSBrxLS1iBMJoGxKtsyQ_thumb_a4fdhSdzVSWNSd2ale%Z2xdqpA_thumb_a4ffBK%IISbuxq9gKEAnsZQ_thumb_a502WdSuiDSnQvOoGWjyY7PgnQ_thumb_a507

Add the pasta to a large pan and cover in boiling water and a couple of generous pinches of salt – simmer until al dente the drain.

Whilst the pasta is cooking make your basic white sauce – recipe below.

Crumble in three quarters of your Stilton and all of your cheddar into the sauce along with the mixed herbs and whisk to combine warm until all the cheese has melted, grind in a generous helping of black pepper and remove from the heat.

Chop all of your veggies and soften for a few minutes in a large frying pan with a dash of oil.

Combine your pasta and veggies in a baking dish and pour over your cheesy sauce.

Crumble the remaining stilton over the top then sprinkle over your breadcrumbs.

Pop the dish in the oven and bake for 30 mins by which time the inside should be nice and gooey with a satisfyingly crispy top.

Basic White Sauce

I avoid calling this a Béchamel as technically you should be heating the milk with bay leaves, mace an onion first but who has time for that – especially when you are about to add as much blue cheese as you can!

Melt the butter over a medium heat, remove the pan from the heat then stir in the flour until in forms a smooth paste with no lumps, put the pan back on the heat – add a splash of the milk and whisk to combine, add the rest of the milk and continue to whisk until all the paste is combined and simmer for about 3 mins to cook out the taste of the flour – whisking occasionally.

I then took down and carefully wrapped all the Christmas decorations ready to go back in the loft for another 11 months.


The Orange

Joel had an idea for this new year, instead of setting resolutions that are inevitably negative and about deprivation we are setting goals for the year instead, for me its to write more on here, to see more paintings out of my 1001 paintings to see before you die and definitely getting started on our garden, I’m sure over the next few weeks there will be more set but I like the idea of striving to achieve something rather than giving something up, which in the dark days of January feels twice as miserable as any other time of year.

I think January is a tough month for people, the depths of darkness with no Christmas to look forward to, the weather tends to get colder, and of course everyone is feeling a little tight on funds after the festive period. Therefore I think we could all do with something bright an fresh to cheer us up, this is a great salad for sharing and you could definitely justify it if unlike me you are trying to stick to those resolutions – plus the dressing uses up some of that cheese board port you still have knocking around (the booze doesn’t count in food, everyone knows that) so why not invite a few people over and brighten up January together.

Oranges always feel like a bit of a faff to me and would normally grab a clementine or tangerine over their full size cousin as the convenience of being able to peel on the go is so easy so I think when you go to the effort with peeling and carefully slicing an orange it feels a bit special. Particularly when they are in season and at their best from closer to the UK at this time of year.

Caramelised Orange and Fig Salad

Adapted from Ottolenghi’s in Plenty More

Serves 4 as a light salad.

  • 75g of caster sugar
  • 4 Medium Oranges – peeled and cut into 1cm slices
  • 8 Fresh Figs – quartered
  • 200g Feta
  • 1 bag Rocket
  • 1 Bag Baby Kale – or other sturdy salad leaf

Port and Lemon Dressing

  • 3 tbsp Lemon Juice
  • 3 tbsp Port
  • 1 tsp Fennel Seeds – toasted
  • 4 tbsp Rapeseed or Olive Oil

wmmKVa4oTJqbgAHd70R23w_thumb_a4c8dKaxbhAeReixGxQzbQo9qQ_thumb_a4cc7sk8lySoT7eKTGBtEaj0rA_thumb_a4cdMj5ATpUYRrasxJWcgm2aCg_thumb_a4d7

Warning: I am crap at making caramel – its gone wrong so many times in the past but the last few times I have done it right so here is the best way I’ve found to do it.

Using a (clean and very dry!) flat based frying pan pour the sugar in ad shake the pan to distribute evenly, put onto a medium heated hob. DO NOTHING, do not touch, do not shake, do not stir, just stand and hold your breath. The sugar should begin to melt and turn a lovely well caramel colour.

If not – if it clumps into a horrible mess unlike me don’t throw a paddy just add a cup of water to the pan and stir to the sugar all dissolves and makes the washing up a lot easier, clean and dry your pan and try again – hey at least sugar is pretty cheap.

Whilst your sugar is melting (or before if you are really anxious to watch it) spread your salad leaves over a serving platter, arrange half of the figs on top and crumble over half the feta.

Once you have your lovely golden caramel add half your orange slices whilst keeping on a medium heat, turn them over after about a minute, by which time they should have a lovely shiny caramel coating, allow another minute on the reverse side, set to one side then repeat with the rest of the oranges.

When all your oranges are caramelised remove the pan from the heat and add your dressing ingredients into the pan along with the caramel, give a quick stir to combine then pour into a jug.

Arrange your Caramelised Slices of orange over your salad platter, scatter your remaining figs and feta over the top.

Serve warm with the warm port and lemon dressing.

Note: If you would like to use this dressing on other things – which I highly recommend as it’s delicious then add a 1½ tbsp of honey to the above ingredients as you wont have the sugar from the caramel to balance!

I hope you have a wonderful new year and you achieve all those goals you set big or small.

Spinach

It feels like we have skipped autumn and jumped right into winter with all the storms we have been having, its not that its cold but it sure as heck is rainy. I love being back up North but I do miss those cold crisp winter days we used to get in London, Manchester is more mild and soggy, the leaves never quite dry up enough to crunch underfoot but its our city and I love it despite the rain.

We have a large Oak tree and a sycamore at the end of our garden which have been keeping us well stocked in soggy leaves so I have been making leafmold ready for the wonderful garden I will have built by this time next year when it is ready. By making leafmold, all I really mean is squashing up the leaves and packing them into black bin bags with a few air wholes in then piling them up at the bottom of the garden. Absolutely minimal effort for what Monty Don assures me will be the gardener’s equivalent of gold dust.

The wild weather does call for something soothing, warm and dare I say it healthy. So time for some green sludge soup. Spinach is a tricky one I add it to a lot of dishes but mainly ones where I can hide the cooked texture a bit, I love the flavour but I find the texture a little slimey so give me it pureed, give me it hidden into dishes or in a stew but never fried on the side – and only ever chopped up minutely in eggs. Soup therefore is the perfect vessel for this veg in my opinion.

Full of vitamins that boost energy levels it should give you a little boost in these rapidly shortening days.

Green Sludge Soup

  • 400g of Spinach
  • 2 Potatoes
  • 2 Shallots
  • 4 cloves of Garlic
  • Olive Oil
  • 1 tbsp of Vegetable Bouillon Powder
  • Nutmeg
  • Salt and Pepper

To serve – and make more elegant, less sludgy

  • Crème Fresh
  • Poached Egg

WlSJVfkFQHqrQ032jgXffQ_thumb_a2aeiHT45HsLS4i0Vpc%skuttA_thumb_a2b4kQmLIO6US3C+NG9aClNRyA_thumb_a2b6bCPv1OVYT6+FYyfcrbFITQ_thumb_a2c0

Chop the shallots finely and add to a large saucepan with a splash of olive oil, ry until the onions are soft then add the chopped garlic.

Peel and finely dice the two potatoes and add to the pan. Along with the bouillon powder and a litre of boiling water.

Simmer until the potato is cooked through – about 15 mins then add the spinach to the pan – half at a time, it will look like there is no way it is going to al fit in the pan, but trust me it will reduce to almost nothing in the steamy soup. Once all the spinach is added cook for a further 5 mins.

Take off the heat and using a stick blender blend until smooth. Grate in half and nut of nutmeg and a good pinch of salt and pepper, stirring to combine.

To serve mix crème fresh with equal parts of water in order to make a runny cream, drizzle into the bowls of soup, top with a poached egg and another grating of nutmeg and black pepper. Toasted and buttered soldiers are great with it too.


Runner Bean

So things have been very quiet on the blog for a few months, there has been a lot going on for me in the real world, Joel and I have bought and moved into our own house, we got married on a gorgeous sunny day surrounded by all our friends and family, Joel had a nasty bicycle vs car accident, which thankfully he has now recovered from.

We are spending time working on the house, making it ours and I have so many plans for the garden. Although with everything going on this summer the furthest I got with growing veggies was popping in the runner beans Joel’s parents gave us, and my usual salad leaves and herbs. Considering I literally stuck the small runner bean plants in the ground and stretched some string across the fence for support the runner bean plants did amazingly well, we have had a more beans than we could eat since the start of July. They are now coming to an end, the big chunky ones I have left on the plant till they dry out and I can harvest the beans to plant next year, the rest of them I have turned into chutney.

Our family friends Jenny and Peter make this chutney every year and it is always delicious – just the right balance of sweet and tangy so of course I had to get the recipe from them to make with my last batch of beans from the garden. The recipe came from the queen of reliable recipes – Delia, I should have known.

Spiced Pickled Runner Beans

Adapted from Delia’s recipe

  • 900g of Runner Beans – trimmed and sliced
  • 700g Onions – finely chopped
  • 850ml Malt Vinegar
  • 40g Cornflour
  • 1 tbsp Mustard Powder
  • 1 tbsp Turmeric
  • 1 tsp black pepper
  • 675g Demerara Sugar

b8CYbagjTXWFMBkGj0A6WA_thumb_a3a4kgD3Zi5YSZyIbP3Il0B67A_thumb_a3a8wUEYZqjnTk2V%Odq5Fiy0Q_thumb_a3aay0Q9PC6HTz20w8FMX1HJIA_thumb_a3af

Add the chopped onions and 300mls of the vinegar to a large pan and simmer until softened – around 20 mins.

Boil the sliced beans in a separate pan – Delia suggests 5 mins but I cooked mine for 10 due to now being a little tough, drain and add to the onion and vinegar mixture.

Mix the spices and corn flour with a little of the remaining vinegar to make a paste then add to the onion mix along with the rest of the vinegar.

Simmer for 10 mins, then add the sugar and simmer for a further 15 mins.

Pot the pickle into warm sterilized jars and leave to mature for at least a month.

Also here is a few pictures of our adventures over the past few months I’ve been away from the blog.


UNADJUSTEDNONRAW_thumb_a10f056232


Chinese Cabbage

With everything going on at the moment I’m glad to say we have still had time to cook although we are relying on tried and trusted favourites rather than anything particularly creative but there is definitely something to be said for healthy meals you can shop for and cook when you are shattered, have lost your list and wouldn’t be able to remember which cookbook the recipe was from anyway.

When we came back to Manchester I re-signed up to our local veg box scheme that I used to get as a student which is great, every Tuesday evening we get a surprise mix of local and organic vegetables and I get very over excited like a weekly veg equivalent of Christmas morning. Currently we are getting a lot of brassicas – Broccoli, Romonesco, Sprouts and a new variety of cabbage every week – so we can at least feel like we are getting our greens. A couple of weeks ago we received a Chinese cabbage and I thought I’d try something different to my go to shred it and fry in in butter (don’t get me wrong that is still delicious!).

I thought given the name I may as well try an oriental themed dish – I cant promise this would be the most authentic of recipe but the flavours were great and it was surprisingly quick to cook . I’ve never really tried cooking with cabbage leaves as a wrapping and I was a little skeptical that they would hold together rather than collapsing into a pile of mush, but low and behold my off the cuff technique worked really well.

Cabbage Rolls

  • 1 Chinese cabbage
  • 400g pork mince
  • 4 spring onions – finely chopped
  • 2 tbsp grated ginger
  • 3 cloves of garlic – crushed
  • 1 egg
  • 1 tbsp rice wine vinegar
  • 2 tbsp light soy sauce
  • 1 tbsp sesame oil

img_3980img_3988img_3991img_3992

Add all the cabbage roll ingredients other than the cabbage to a bowl and combine to make a meatball like consistency.

Carefully separate the leaves of the cabbage and wipe each one clean. Layer the leaves up in a steaming pan and steam for 3 minutes until the leaves are soft but still maintain their structure.

To assemble to rolls take a cabbage leaf, add a rounded tablespoons worth of meatball mixture to the innermost side and roll up towards the green end carefully tucking the sides in so that the cabbage covers all of the meat mixture, repeat until you run out of cabbage leaves or meatball mixture.

Arrange the rolls in a steamer and steam over boiling water for 20 minutes.

Serve with noodles or a crunchy stir fry or both!